Author Topic: Charles' Custom Dragonfly  (Read 890 times)

crgaston

  • club
  • Senior Member
  • *
  • Posts: 640
Backplate binding
« Reply #60 on: May 24, 2006, 02:12:52 PM »
Ebony is good on the center.  If one of the others goes, then do all 3, but I think it won't look out-of-place with it just in the middle.  
 
If, however, you think it's best to go ahead and do all 3, then I'll trust your judgement.
 
Thanks,
 
Charles

mica

  • alembic
  • Senior Member
  • *
  • Posts: 10595
Little Point
« Reply #61 on: May 05, 2006, 01:11:39 PM »
So Chip sketched in a "little point" on the back laminate. Here's what he came up with:  


 The inside line is about where the roundover will start.   The outside line is the cut line.   To keep that whole area that looks like a point in the grain, the point will have to get a little longer than the suggested "Valentino point" you were basing the idea on.  

  Let me know if you want to:  1. have a longer point and capture that whole shape   2. use the smaller point shown here  3. make it yet smaller

crgaston

  • club
  • Senior Member
  • *
  • Posts: 640
Little Point
« Reply #62 on: May 07, 2006, 07:31:51 PM »
Mica,
I'm a little confused because I'm seeing 2 sets of lines, both white and grey.
 
If we start from the top, there is  
white
grey
white  
grey
 
I assume you mean thet the white lines go together as roundover and cut lines, and that the grey ones do, too.
If we start the roundover at the first white line, will the grain still retain the point shape in the roundover, or will it separate?  Or is that a mystery until it's done???
 
Is the grey line the standard point shape, or is it still reduced somewhat?
 
I think I would like it as small as possible while retaining the natural point in the grain.
However, I really like the lines of the Valentino point.  
 
I am thinking we go for the white, and if the grain separates visually in the roundover, we can make it smaller.
 
Any input from anyone is welcome.
 
 
Call me or email if you need to...
Thanks,
 
Charles

mica

  • alembic
  • Senior Member
  • *
  • Posts: 10595
Little Point
« Reply #63 on: May 19, 2006, 02:31:29 PM »
Right now, Peter is working on the carving for your bass. Here's a detailed sketch he's prepared to show what we have, and what we can do:


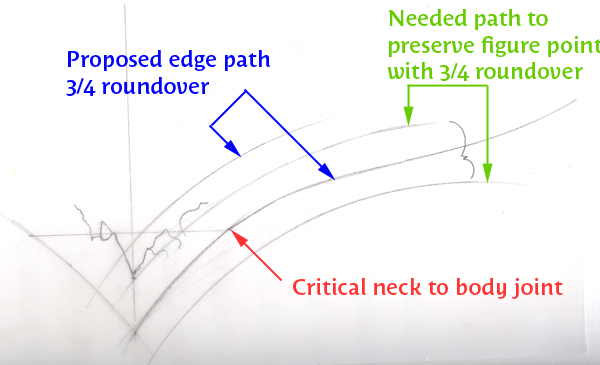
The red arrow indicates a critical point where the neck meets the body, the point carving must pass throungh this point or to the outside of it.  
 
The blue arrows indicate a path that keeps the point rather small and doesn't interfere with the critical neck to body joint. Of course, you can see the 3/4 roundover will take the edge off the figure point.  
 
The green arrows reference the edge path and 3/4 roundover needed to preserve the figure point, and cannot be done. Peter has drawn these in for your reference only. Even if there was enough wood to do the green path, the point would be considerably larger than your original request.  
 
One idea is to hand contour the roundover on the back near the point and then blend it back into the 3/4 roundover, much like we did on , but his has a 1/2 roundover on the heart, then a 3/4 on the edge. The front of the bass would have the standard 3/4 roundover.
 
So, the choices are:
 
1. use the blue path and 3/4 roundover as in the sketch.
 
2. hand contour the roundover on the back only near the point
 
3. abandon figure point preservation and return to the small point regardless of where the figuring winds up.
 
Let me know what you want to do. Carving the point on your bass will wait until we hear back from you, though the rest of the carving will proceed.

crgaston

  • club
  • Senior Member
  • *
  • Posts: 640
Little Point
« Reply #64 on: May 20, 2006, 12:28:30 PM »
Thanks, Mica and Peter.
 
Let's try the blue line, reserving the option to go smaller after seeing it.

mica

  • alembic
  • Senior Member
  • *
  • Posts: 10595
Little Point
« Reply #65 on: May 22, 2006, 01:32:45 PM »
Check the new photos, let me know about the pointiness preference.

crgaston

  • club
  • Senior Member
  • *
  • Posts: 640
Little Point
« Reply #66 on: May 23, 2006, 09:35:04 AM »
Good morning, Mica.
 
Lets go smaller.
 
What's there is cool, and Peter did a great job capturing that v-shape, (plus it'd be handy in a bar fight),  but I think it will be great with the little vestigial point.
 
Oh, and did I mention that the rest of the woodwork IS SO AMAZING THAT I ALMOST CAN'T STAND IT!!!!!!
 
Wow.  On that point close-up, the center laminates in the neck just seem to Exist in the middle of the body, like there's no separation between the neck and body; and the ebony accent lam is like a vein or reservoir of darkness flowing from the neck and percolating up through the maple as the spalting, permeating or infesting it with it's energy.
 
Y'all got skills.
 
I'll call you when I get home from work.

crgaston

  • club
  • Senior Member
  • *
  • Posts: 640
Mica, you rock!
« Reply #67 on: April 20, 2006, 05:46:42 PM »
Thankyouthankyouthankyou!!!
 
 
This is wonderful!  Even cooler than I had imagined!
 
But there isn't supposed to be a BTC back. Pleeeease make sure that's on the W.O. before it's too late!

lidon2001

  • club
  • Senior Member
  • *
  • Posts: 608
Mica, you rock!
« Reply #68 on: April 20, 2006, 06:03:57 PM »
Forgive me Charles, but I just have to ask.  If we have to wait, I certainly understand.  What is this Dragonfly Mica speaks of?
 
Thanks!  May it be all you want it to be.
 
Tom
2005 MK Deluxe SSB, 2006 Custom Amboyna Essence MSB, Commissioned Featured Custom Pele

crgaston

  • club
  • Senior Member
  • *
  • Posts: 640
Mica, you rock!
« Reply #69 on: April 20, 2006, 06:07:15 PM »
Oh, no problem at all.  Susan has designed a gorgeous dragonfly inlay that's going on the back of the headstock, which is the reason it's spalted maple, so as to provide more contrast.
Throughout the design process all our emails have had Dragonfly as the subject line, so I guess it's kind of become the name for the bass.
 
The bass itself is a 5 string Balance K with SII electronics.
 
(Message edited by crgaston on April 20, 2006)

crgaston

  • club
  • Senior Member
  • *
  • Posts: 640
Mica, you rock!
« Reply #70 on: April 24, 2006, 05:22:36 PM »
Although it's not really evident with the (continuous wood) backplates removed (see build record thread), there is also a freaky insectoid face in the back wood.

trekster

  • club
  • Member
  • *
  • Posts: 161
Mica, you rock!
« Reply #71 on: April 25, 2006, 04:51:07 AM »
mmmm...Waspinator likes...Waspinator forever!
 
(sorry folks -- been watching Transformers: Beast Wars with my kid lately....)
 
--T

applejuice

  • club
  • Member
  • *
  • Posts: 111
Mica, you rock!
« Reply #72 on: April 25, 2006, 03:56:40 PM »
That neck is amazing. I can't wait to see it finished.

crgaston

  • club
  • Senior Member
  • *
  • Posts: 640
Thanks!
« Reply #73 on: April 24, 2006, 05:15:35 PM »
Mica, Susan, and Val, thanks for all you work in making sure this is going to be the best bass it can be.  Although it's been said soooo many times before, Alembic really are the Queens and Kings of customer satisfaction.
 
Thanks again,
 
Charles

mica

  • alembic
  • Senior Member
  • *
  • Posts: 10595
Pickup selector location
« Reply #74 on: April 24, 2006, 04:16:27 PM »
I've got your work order noted with the change to move the pickup selector to the lower horn on the standard round brass plate. The plate will also have the blackened finish to match the rest of the hardware.